How To Create Folder Outlook
Microsoft Outlook: Folders, Sub-Folders and Automatic Forwarding
Folders in Outlook are a great feature to help you organize your workflow. EMail services can often get messy with so many different types of emails coming in to one account. If proper care isn't taken, you can even be at risk of accidentally buying into scams! Using the tools taught here will help you work faster, safer and easier.
Folders And Sub-Folders
Folders and Sub-Folders are Outlooks best tools for you to categorise and streamline your emails. Any given email account could have all types of emails sent to it, be they personal or business.
Being able to create a Folder to organize your emails is a great tool, and means you don't have to sift through a huge inbox just to find what you are looking for. The following guide will show you how to create folders.
Create A New Folder In Outlook
Step-by-Step guide on when and how to make new Folders in outlook.
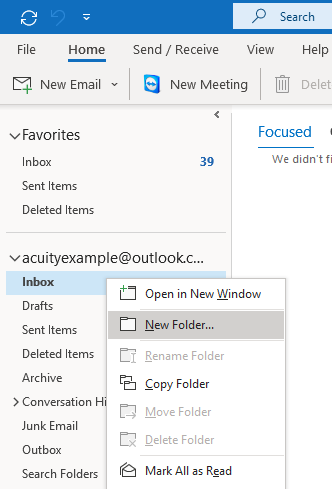
– To create a new folder in Outlook, right click your inbox and click New Folder as shown. This will then prompt you with a text box
– Depending on its contents, you want to name the new folder appropriately. For this example I am naming it "Business". Type in the name for the folder and press enter. You should see your new Folder below the Inbox (you may have to click the dropdown to see it). Click on the folder to see its contents!
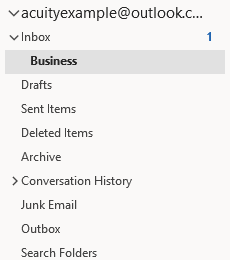
Just like that – your email is now more organised and you can create a folder whenever you need!
A great example for when to create folders is to split your email into Personal and Business. This stops you from having to have several email accounts and prevents you running into issues with password management.
However Business is quite a vague topic, and could entail many different types of email. Because of this you should make a subfolder! However a good piece of advice would be to not make too many, so you don't have too many folders to organize.
Create A Subfolder In Outlook
Step-by-Step guide on when and how to make a Subfolder in outlook.
– Once you have your new folder, you can create a subfolder. Simply right click the folder (here I am using the Business folder) and click New Folder as before. Then type in the name for the folder and press enter (here I have used Finances).
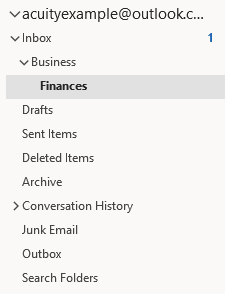
– Note that the subfolder appears another level below Businesses, and you may have to release the drop down again to see it.
So now you have a new folder and a new sub folder, but no emails in either! Once you decide what type of emails you want where, the final step is to Filter emails into folders. If you are want to reach a lot of people at once, you can view ourcomprehensive guide on making group email quickly in Outlook 2010.
Moving Emails To Folders – Manually and Automatically
Moving your Emails to your new folder is best done automatically, so you don't have to continuously redo the process.
– To manually move an email to your new folder, click onto it and then find the "Move" button above in the toolbar. Click move and then click the new folder you want to move it into (highlighted below).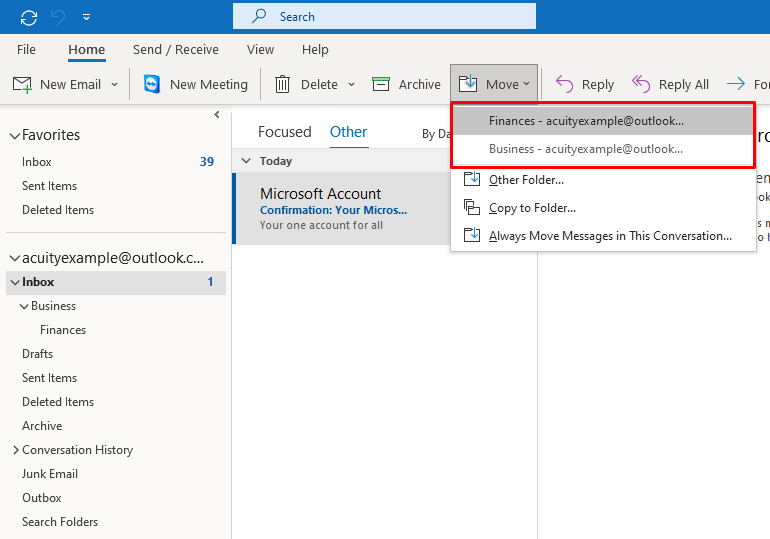
– If you want to automatically move emails however, you can click the "Always Move Messages In This Conversation".
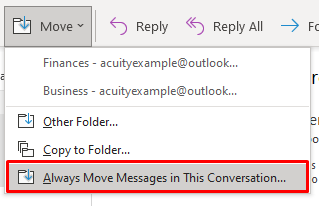
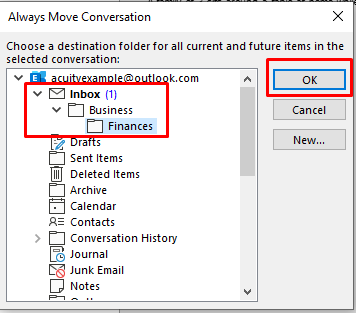
– You will then see all your folders, and can select the one you want to move this conversation into. Then hit OK or press enter.
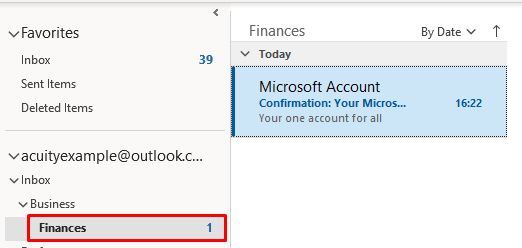
– And just like that you have your emails inside your new folder! Now whenever this person continues to email you or reply to this thread, their emails will go straight into the selected subfolder. You could even view our step by step guide to setup an automatic reply in Outlook for this conversation.
Now you can create folders and sub-folders, and streamline your entire workflow! To learn about all tools Outlook has to offer, view our Course Offerings on Outlook.
How To Create Folder Outlook
Source: https://www.acuitytraining.co.uk/news-tips/create-folder-outlook-2010-mail-box/
Posted by: welchnotheeptist.blogspot.com

0 Response to "How To Create Folder Outlook"
Post a Comment