

How To Create An Add On
Create an add-on
This topic provides an overview of an add-on creation workflow and describes the steps to create a work-flow in the UI.
Add-on Builder workflow
The following diagram shows a common workflow for creating an add-on. 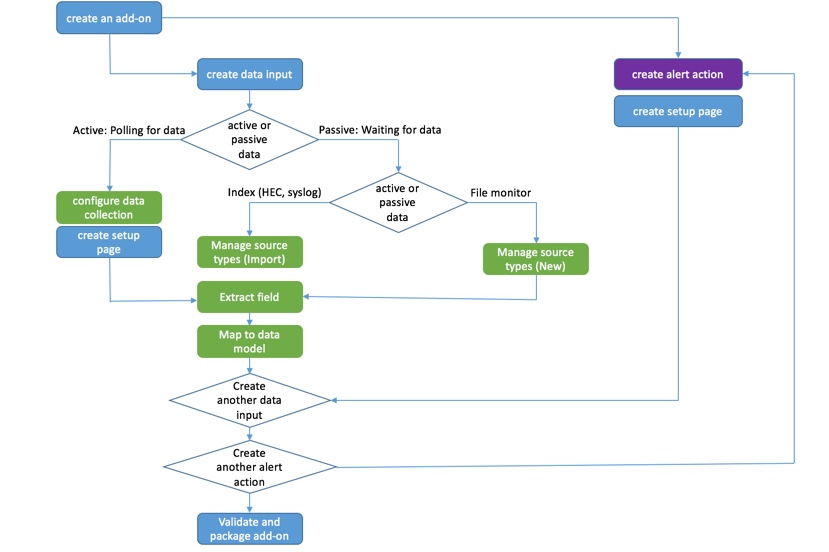
| Workflow action | Description |
|---|---|
| Create a data input | Get data into your add-on by configuring data inputs. |
| Configure data collection | Configure a data input by:
|
| Create a setup page | Create a setup page for your add-on. A setup page prompt users for information to run your add-on, including authentication. |
| Manage source types | Add or import a source type. Add sample data to your add-on so that you can add knowledge objects from it. You can import data from an existing source type or upload sample files. |
| Extract fields | Create field extractions from your configured data inputs. |
| Map to data model | Map the fields from the field extractions to the data model you want to use. |
| Create alert actions | Create custom alert actions, for example, running an adaptive response action for Splunk Enterprise Security. |
| Validate the add-on | Validate the add-on for best practices, and test the modular/scripted inputs, field extractions, and data model mappings. The Splunk Add-on Builder shows you any errors or warnings, along with recommendations about how to address them. |
| Package the add-on | Package the add-on when you are ready to install your add-on and use it. The result is a compressed file that contains a directory with the necessary configuration files. |
Create an add-on
1. Click Create an add-on in the Add-on Builder home page.
2. Set the following properties for your project:
| Property | Description |
|---|---|
| Add-on Name | The name of the add-on. |
| Author | The author name, which appears with the add-on in Splunk Web. |
| Add-on Folder Name | The folder name for the add-on under $SPLUNK_HOME/etc/apps/. Add-on folder names have a prefix of "TA-". For add-ons created by Splunk, the folder name prefix is "Splunk_TA_". These prefixes cannot be changed. To change the folder name, click Edit. |
| Version | The version number of the add-on, which appears with the add-on in Splunk Web. |
| Description | The description of your add-on. |
| Visible | Indicate whether you want the add-on to be visible in the Splunk Web app list.
|
| Icon | Upload an image file to use as the icon for your add-on. The Add-on Builder creates a large version (72x72 pixels) and a small version (36x36 pixels) of the icon from this image. |
| Theme Color | The color to use for your add-on. |
3. Click Create to save your settings. The Splunk Add-on Builder displays a home page for your new add-on with the workflow for building it, including a summary of the objects you have configured.
How To Create An Add On
Source: https://docs.splunk.com/Documentation/AddonBuilder/4.0.0/UserGuide/NameProject
Posted by: welchnotheeptist.blogspot.com
0 Response to "How To Create An Add On"
Post a Comment